8891b3cde3085a3fe8706585f78f162420f98177.exe
The very first rule in solving this kind of questions is we need to analyze it to determine information that needed to solve this binary. Example of information that we surely need is to determine whether our binary is 32 bit or 64 bit, or type of packer used to protect/compress the binary.
To do this kind of analysis, we can use various tools that specialized in analyzing this type of binary, like an example the famous PEiD, which many people using it. For me personally, I usually use Exeinfo PE by aslsoft, which is kind a bad beast which have tons of features. Another one that I prefer to use is Detect It Easy by NTInfo, which can run natively for both Windows and Linux platform. I will leave that choice for you to decide, but no worries, because most EXE analyzer will much do the same thing :)
So load up our binary with analyzer, which I using Detect It Easy for this example

my apologize for da potato image :(
From the scanner, at the compiler section, it shows us "MingW GCC" is the compiler that compiled our binary, and at linker section, GNU Linker is linker who linked all compiled objects into one single binary file. If we see more, "EXE32 console" is also there.
So from the information that we got, we can deduce that our binary is 32-bit application, and no packer was detected (because scanner only show "MingW GCC"). From this information, we can simply study the binary, without worrying much to unpack the binary.
Let's try to test our binary by open it up, here is screenshot from the interface
Note : I'm solving this binary from my Ubuntu Linux, so there's wine text appear before the binary name (to enable me run basic Windows binaries in Linux), if you're using Windows, simply just enter binary name and press enter.

After we insert some random user input, error message Wrong keys at 0 is appear on the screen

However, from the above error message, there is unusual number appear at the end of error message, which from our case, is 0. So what's it? It's some kind of random number? Character index? We don't know it yet and we will find out later :)
So, like any other binary challenge, we need to reverse engineer it to find out how this binary works, how key checking works behind the hood.
For this process, we need a debugger that can allow us to do so, the most famous one is Ollydbg, if you're from CTF or reverse engineering community, surely you will hear that name somewhere ;). Ollydbg is a versatile debugger, which have many people using it including security researchers and malware analysts. It also has tons of useful plugins that can aid us in analyzing unknown binary. By the way, I'm using OllyDbg 2.01 in case you want an interface that looks same with mine. ;)
So, open up your OllyDbg, interface will pretty much look like this

Open up the binary by clicking File -> Open and select binary from file selector dialog. After you done it, OllyDbg interface will look like this

So as you can see, it's containing shit load ton of weird assembly language. If you can't understand any of it, better if you try to read some of basic reverse binary & Assembly from daisuke's blog. :)
So, at this point, we need to find our main program execution, without much hassle, our main function is already below at address 00401500!

the highlighted section is our main function
Some of you might ask, how can I know that section is our primary program execution part? Simple, by looking at our previous running console application (see image previously), there is exist one message "Crackme1 Challenge. Enter...", by simply looking at the code that I highlighted, there is also exist the same reference string, so we can safely deduce that part of the assembly is our main execution program.
However, there is also exist another way, by backtracking all reference strings, which also can take us into the same section, but I will leave that for you to discover as it's not in this write-up scope to cover. :)
So, set up breakpoint at the first assembly instruction (00401500) at our main function, so when program execution reach at first main assembly instruction, it will automatically stop running (pausing), enabling us to step through the code :)

Let's analyze what's assembly is doing, from first highlighted 3 instruction

It's known as function epilogue, which its task to set up a new stack frame, and save previous caller stack frame into the stack. AND ESP,FFFFFFF0 is to align stack address into 16-bit alignment, if you play a lot with binary that was produced by GCC, you can see it almost on every function epilogue :)

For next 7 instructions, our binary put 7 hex bytes into the stack, currently we don't know what the purpose of binary by doing so, so let's skip and proceed with another

For next instruction, we can see the binary is printing out string value to the user (by using printf()) and taking user input (through gets()) which will be save on LOCAL.21.
For next instruction, LOCAL.1 is set to zero, and afterward JMP SHORT 004015C0 is taken to the address 004015C0, which will check if LOCAL.1 is less than equal to 6
If condition is true (LOCAL.1 <= 6), it will jump back below to previous code section at 00401553, so by using our common sense, this is a loop! and LOCAL.1 is the index of our loop! And this loop will run 7 times (remember less than or equal) :)
So let's study what is the content of the loop,

At this point, EDX will store address of pointer to our user input, while EAX is the index to access EDX string, which can be seen at this instruction MOVZX EAX,BYTE PTR DS:[EAX], eax will get each byte from edx[eax] (edx is string pointer, eax is index previously before overwritten by single character)

After eax got single character from EDX string pointer, here is our main part, the character is xored with 0x41 and the result will be store inside ECX.

After that, xored character byte inside ECX will be store in memory address LOCAL.26+3, with EDX act as string pointer and EAX as string index.

Here is another important part, from the first 4 instruction above that I highlighted, EDX will take xored character from memory LOCAL.26+3, and EAX will take bytes from memory LOCAL.23+1, but, what is LOCAL.23+1? Do you remember first 7 instructions at the very beginning of our function, which binary will try to store unknown 7 bytes into the stack? YES!! LOCAL.23+1 is referring to that byte
After both EDX (xored character) and EAX (bytes from LOCAL.23+1) got their own value, comparison between those 2 registers is happen, and Jump with Equal (je) condition is taken if both their value same.

From assembly in picture above, we can see, if jump is not taken, (if EDX and EAX is not equal), our program will throw error message, and will automatically exit using exit() function.
WAIT A MINUTE! Do you remember at our testing previously? Where unknown number is thrown away with message error, by looking at printf error instruction, that number is actually LOCAL.1, which is our loop index! So that number is actually a hint, referring to what index is falsely compared :)
After jump is taken, it will go to location 004015BB, which will increment our LOCAL.1 and compare if index is less than or equal with 6, if condition is true, loop will happen again :)
By getting all information above, we can construct a simple C pseudocode that rewrite complex assembly into code that's easy to understand :)
1 2 3 4 5 6 7 8 9 10 11 12 13 14 15 16 17 18 19 20 21 22 23 24 | printf("Crackme1 Challenge. Enter the secret key:") input key LOCAL.1 = 0 while(LOCAL.1 <= 6) { edx = key[LOCAL.1] edx = edx ^ 0x41 // get bytes from LOCAL.23+1 eax = (LOCAL.23+1)[LOCAL.1] // compare and throw error if not eq if(edx != eax) { printf("Wrong keys at %d", LOCAL.1) exit() } LOCAL.1++; } printf("You win!"); |
So what's content of LOCAL.23+1? easy, we can simply find it using OllyDbg feature which is Follow In Dump

And after follow, we can clearly see the bytes from hex dump menu, which I highlighted below

As you can see, I highlighted seven bytes because if we look back at our assembly instruction, our binary insert 7 bytes of data into the memory/stack, so the first seven bytes is the only what important for us :)
Hex that we extract is : 0x09 0x20 0x22 0x2A 0x70 0x71 0x70
Note that above hex is still not the flag that we want. After getting so far, and extracting all information that we needed to solve this binary, how can we solve it? The technique that binary author used to encrypt the key is known as XOR cipher, which is example below
Let say, we want to cipher 0x90 with key 0x35, we simply 0x90 ^ 0x35 = 0xA5, so 0xA5 is our ciphered byte, if we want to decipher it back, we just xor the ciphered byte with same key, 0xA5 ^ 0x35 = 0x90, we ended up getting back our original data :)
So, in our binary here, what's the key? .... haaa the key is 0x41, which used to xor our user input!
Getting all hex we want, and key, we just simple decipher all bytes back. For that task, I wrote simple PHP script which can done that task
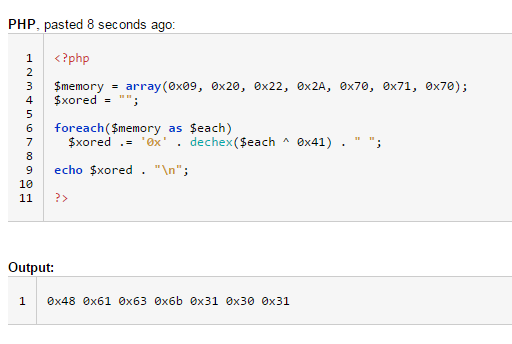
After we xored hex dump with our key, the result we got is
But this is not the flag that we want, looking at the hex pattern, what can you deduce? Yesss it's ASCII characters!
By simply modifying my PHP to print ASCII instead of raw hex, we got our nice flag :)

1 2 3 4 5 6 7 8 9 10 11 | <?php $memory = array(0x09, 0x20, 0x22, 0x2A, 0x70, 0x71, 0x70); $xored = ""; foreach($memory as $each) $xored .= chr($each ^ 0x41) . " "; echo $xored . "\n"; ?> |
The flag is Hack101 :)
So this is the end of my write up for this binary, hope somebody can learn something through my simple write-up, and if you found any problems or wrong info inside my write-up or simply any other questions, don't hesitate to comment below!
Regards,
Just Another CTF Newbie
Edit (2 / Feb / 2016 ) :
There was a mistake in my code, in my first PHP screenshot example, conversion result for PHP by default is decimal, but I mistakenly padded '0x' in-front of each resulted decimal number.
I had corrected that mistake, thanks to Ariff Yasri for pointing out this one for me.
Good write up!
ReplyDeletethanks :)
Delete